The link below will show you how to create a page curl effect on your photographs. Not really photography, yes, but it's fun and can make your scrapbooking look more realistic.
Monday, December 18, 2006
Monday, December 11, 2006
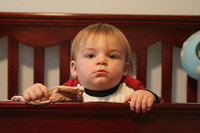
Liam's 1st Birthday
This is a picture I took of my son at his 1st birthday party. Nothing special here, except for the subject!
Which leads me to the most important aspect of photography -- none of it matters unless you have a really awesome subject. All photography is about the subject. Sometimes it's obvious, sometimes it's not. But it's always about the subject.

Which leads me to the most important aspect of photography -- none of it matters unless you have a really awesome subject. All photography is about the subject. Sometimes it's obvious, sometimes it's not. But it's always about the subject.
Shooting holiday lights
Here's a link to a great article on how to shoot holiday lights from Ritz Camera.
Wednesday, December 06, 2006
Phenomenal picture

Politics aside, this is a fabulous picture. I like how the focus is crisp on the President and the two fellows beside him but progressively out of focus on everybody else. This effectively tells the story of a very important meeting.
Great photograph!
Wednesday, November 22, 2006
Do megapixels matter?
According to David Pogue, they don't. He did an experiment for a television series where he took a photo with 5, 8, and 13 megapixel cameras, then blew them up to 16x24 by downing the resolution twice.
He posted the poster in Times Square and only one of many passersby were able to tell the difference, and he thought she was just lucky.
Will this change your philosophy or purchasing decisions?
What do you think? Do megapixels matter?
Tuesday, November 07, 2006
Panasonic Lumix gets poor, yet humorous, review
Because this site is not intended to be a review site, I will merely link to a review of the Panasonic Lumix DMC L1K without comment, other than to comment on the review itself -- it's hilarious!
The subtitle of the review is:
"Point and shoot me"
Saturday, November 04, 2006
Alternative to using the flash
When taking photographs, especially of people, and especially indoors, it is quite natural to use the built-in flash on your camera.
Don't do it.
The flash generally leaves a "shine" to your subject that makes it look like an amateur took the photo, which most likely is the case. But you can make your photos look great without using the flash and creating that "snapshotty shine."
Bump up the ISO. Most new cameras have a manual adjustment for the ISO setting. The ISO setting in a digital camera mimics the ISO of film in a film camera. Rather than having to change film, however, the digital solution is much cheaper and easier.
Generally speaking, you should always shoot at the lowest ISO setting possible that renders the best image. Usually, this is ISO 100. Shooting at an ISO of 100, versus at 800, for example, introduces comparatively less noise. But today's digital cameras are very good at the higher ISO settings. My Canon Digital Rebel XT shoots very good pictures at its highest ISO setting, 1600.
Here are two pictures. One was shot at ISO 100 with the camera's built-in flash, the other at ISO 1600 with no flash. See how the picture with the non-flash, higher-ISO setting looks more natural? By the way, there has been no manipulation of either image; the output of the camera was not altered in any way.
|
|

Monday, October 23, 2006
Free eBook on Digital Photography
Dennis Curtin over at ShortCourses.com is offering a free eBook on digital photography. Simply click the link in this story and hop on over to his site.
Tuesday, October 10, 2006
This month's project: Fall
Fall is here, so it's time to take some great pictures of the changing colors, falling leaves, clear blue skies, etc. October is my favorite month of the year: There's usually not much rain, the skies have wonderful blues and clouds, there's a slight chill in the air, and the leaves are turning on the trees.
Saturday, October 07, 2006
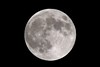
Shooting the (Harvest) Moon
Taking photographs of the moon can be challenging, if you don't know how. However, once you know how, it's super-easy. You'll get great results if you follow these simple rules:
1. Set your camera to full Manual mode
2. Set your shutter to 1/250
3. Set your aperature to f/11
4. Shoot on a tripod
5. Use a shutter release or your timer to minimize shake
6. Zoom in as close as you can get (a 200mm to 300mm telephoto lens works well)
7. Set ISO to lowest possible value (generally, ISO 100 or on some cameras ISO 50)
That's about it. Your image most likely will need some touch up in Photoshop, but it shouldn't require a lot of modification. If it does, shoot again!
Friday, October 06, 2006
Tonight offers a prime opportunity to photograph the moon
The moon is set to appear about 12% bigger tonight, due to it being closer to the earth tonight. Even sweeter is the fact that it's a full moon.
So set up your tripod and start shooting. Recommended: Tripod!, remote shutter release or use the camera's builtin self-timer. Set your camera to Manual mode and set the f-stop to f/11 and the shutter to 1/250. This should keep everything in focus and give you a good exposure. Of course, try other settings -- experimentation is the essence of the art.
Monday, October 02, 2006
Photododo Quick Tip: Getting sharper hand-held photos
Here's a quick tip for getting sharper hand-held photos:
Choose burst mode. The second or third bursted photo will usually be much more in focus (i.e., clearer) than the first.
Here's why: When hand-holding (i.e., not using a tripod or remote shutter release), pressing the shutter button moves the camera, if only slightly. This movement, especially in low light or with moving objects, can really blur a photo. However, when using burst mode, that first shutter press is the only one you'll need to get 2 or 3 (or more) photos. Since the second and third photos do not require a shutter press, those photos will be clearer.
Friday, September 29, 2006
Half Dome Near Dusk
Here's a photo I took while on vacation with my family. This was taken in the Yosemite valley floor near sunset. Simple set up:
Tripod
Polarizing filter
Tamron 28-300mm zoom
Canon Digital Rebel XT
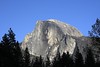
Tripod
Polarizing filter
Tamron 28-300mm zoom
Canon Digital Rebel XT
Friday, September 08, 2006
Techniques on photographing motion
Here's a nice little tutorial on how to capture the essence of motion in your photography.
Thursday, September 07, 2006
Getting exposure right
PC Mag has a really helpful article on getting exposure right. It talks about things like ISO, shutter speeds, aperatures, exposure block, and bracketing, among other things.
It's a good read for beginners and intermediates wishing to bone up on their skills. Taking good photos is not about having the best equipment. It's about doing things right from a technical perspective. It's also about creativity and vision. But you gotta get the shot you see in your head and the best way to do that is to get the shot right in the first place.
You can play around with the shot later in post-processing.
Thursday, August 31, 2006
Fireworks
Fourth of July 2005. I took this picture with my new Canon Rebel XT. It's not a perfect representation of the actual fireworks that took place, but I think it's a really cool image.
What do you think? Let me know!

What do you think? Let me know!
Tuesday, August 29, 2006
101 Ways to improve your digital photography - - courtesy of Christoph Marquardt from Tips from the Top Floor
This site has 101 ways to improve your digital photography. Runs the gamut from instant feedback to composition to lighting and post processing. The author, Christoph Marquardt, runs the very popular site, Tips from the Top Floor, and podcast, also by the same name.
Friday, August 25, 2006
Raw versus Jpeg
An issue that you may have been pondering, or hopefully have already resolved for yourself, is shooting Raw versus Jpeg. There are pros and cons for each, but I have made the ultimate non-choice (where I can have my cake and eat it, too, whatever that means): I shoot both. My Rebel has the ability to capture both Raw and Jpeg at the same time.
Sure, it's a bit slower, but only a little. I shoot both for several reasons.
Raw
- Lossless format
- Can correct exposure and other user errors after the fact
- Ready for casual viewing and printing
- No workflow required for #1
Here's an article that gives a succinct analysis (opinion?) on the issue. It's well worth reading.
Wednesday, August 23, 2006
"Where there’s one good shot, there are at least three good shots."
"Where there’s one good shot, there are at least three good shots."
Who said it? Terry Livingstone, nature photographer. I am sure he didn't say it first, but he says it here in a feature article at ritz.com about making a beach trip a photo safari. There are a lot of insightful things that Terry says in this article. It's a good read about nature and landscape photography.
Tuesday, August 22, 2006
Framing the Shot
One of the most essential, if not the most essential, things that you have to "stick" when shooting is framing the shot. Remember those lousy 60s movies where the film director walks around with his hands to his face in the shape of a frame? It was cheesy in the movies, but in fact this is exactly what you need to be doing when framing a shot.
However, you don't have to hold your hands out like a Hollywood director. You simply use your camera to frame the shot.
Framing the shot is getting those important components of the shot in the shot. What does this mean? It means getting the subject, foreground, and background in the shot in a way that maximizes the effect or emotion you are trying to elicit.
There is one tried-and-true rule in framing a shot: The rule of thirds. Imagine the scene you are capturing is divided into 9 boxes, like a tic-tac-toe game. The points where the horizontal and vertical lines meet are the key places where you want to position your subjects. It's generally safe to say that your subject should not be centered in the middle box; rather, his or her eyes should lay on top of the top intersection, either on the left or the right.
Depending upon the foreground and background and the direction in which the subject is looking, and/or where the action (if any) in the scene is moving towards, will dictate whether the subject's eyes lay on the left or the right upper intersection.
If, say, the subject is looking to his left and he's facing you, then his eyes should be positioned near the upper left intersection.
If the subject is kneeling down and looking up towards the right of the frame, then his eyes should be near the lower left intersection.
As with everything, though, there are exceptions to this rule. Remember, photography is a little science (all that technology!) and a LOT art. Therefore, be wary of sticking to this rule 100% of the time. There are occasions where centering the subject works or where doing exactly the opposite can have quite a good effect.
For example, if you're trying to show symmetry, your subject might be best represented by centering it in the shot.
For a slightly different perspective on framing a shot, take a look here.
Equipment You Will Need
I mentioned in the last post the expense of photography. I should clarify this point a little more. Hence, the topic of this post is what you'll need, at a bare minimum, to enjoy yourself and perhaps get others to dig your work, too.
Basic list
- Camera. Any kind for now will do. Digital is better. Digital SLR is still better. But not completely necessary.
- A computer.
- If you go digital, and why wouldn't you -- Post-processing software. This is a fancy term for "Photoshop" or one of its "equivalents" like Paint Shop Pro or iPhoto. You don't need Photoshop. Photoshop Elements is a very handy, yet inexpensive, tool for editing and tweaking your photos.
You can get an entire basic setup for a few hundred dollars. Anything you want to print, you can deliver it to Costco or one of many fine "photo finishers." So, initially, you don't even need a printer.
Some things that are nice to have:
- Camera bag
- Cleaning kit
- Extra camera battery
- Extra memory cards
- Memory card reader, to transfer images from the card to the computer
- Specialized lenses (zooms, telephotos, macros, wide angles, etc.)
- Filters
- Flashes
- Battery chargers
- Printer, maybe even specialized ink
- Special photo paper (it's not all the same)
The next post will be about framing a shot. How to get that perfect angle/perspective to render the emotion that you envision.
What Is It About Photography That Is So Enticing?
I often wonder why people like what they like. Why does a doctor become a doctor? Well, it must be because he likes "doctoring." Same goes for firemen, politicians, and pilots. Of course, photographers get into photography because they love it.
But why? What makes photograpy so great that you'd want to spend not only your time but your money on its pursuit? Photography can be extremely expensive, in terms of time and money. A good, not great, digital SLR will set you back well over $500. The best ones go for thousands. Lenses can cost at least an arm, if not an arm and two legs. Tripods, external flashes, bags, memory -- it all costs money.
Not to mention the monumental cost in terms of time. Time to set up a shoot, do the shoot, do the post-processing and printing, the delivery -- one could easily spend 24 hours a day perfecting his craft.
However, that's impossible, and, quite frankly it is not the objective of this site. The objective of this site is to pique your interest in photography, bring out your creativity, and enjoy one of life's most interesting and passionate activities.
So, sit back, relax, and enjoy. Until you can't. Then, just go out there and snap some shots.
Welcome to my Photododo Blog
Hi! This is my first post to my blog, Photododo. Why Photododo? I don't know; it just sounded cool when I said it. I tried Photo Hound. Taken. Photo Monkey. Also taken. Would should I do?
I am kind of a dork; I guess one could say a dodo. Plus, my grandma's nickname was Dodo. So, it kinda fits.
Did I mention that it sounds cool? Yeah? Sorry.
Anyway, I hope to entertain you here with my photographs and commentary on them and photography in general. For now, since this is my only post, please make full use of all the links to the right. These are sources that I refer to almost daily.
Subscribe to:
Posts (Atom)


